After receiving good feedback from my animation, I have followed suggestions to polish up my scene further.
I have spent the last week or so making improvements to each shot. I have included more overlapping and follow through for more fluid movement. I have worked further on the lip sync, and also included saccadic eye movement. I've also tweaked bits here and there, such as finger movements when Bill taps himself on the chest. I think there is a definite improvement, the whole animation is more fluid and less jerky. I've also re-rendered it in higher quality, 1080p HD (before it was 720p). Although it took over 12 hours to render, it was definitely worth it.
Here is the animation after the extra run of detail:
I am happy with my final piece. I feel that I have managed to create appealing characters, capture the emotion and convey the light-hearted, comical nature of the scene. I used the principles of animation as a guide, but I did not try to force them into my scene.
I feel there were areas for improvement, particularly at the ending with the side on shot where the two characters laugh. With more time spent on this shot, I could have loosened up the movement and made them (particularly Bill) look less wooden as they jolt forward and backward with laughter. The bit where Hrundi turns back to Bill and says, 'Ooh sir, I've seen all of your films', he mainly turns his head, and I feel he could also turn his body (perhaps his shoulders) a little more too as he focuses back on Bill. Also when Hrundi pulls his hand away, then as it comes down, I could have added and tweaked another frame or two in-between, just before it comes to rest. I feel it does look a touch jerky as it comes down.
I found out a lot about lighting during the making of this piece and felt I implemented it to good effect through trial and error. I also played with the mise-en-scene, moving objects such as the beer can around the pool table to balance out the shots. I initially had the can on the table behind Bill, but this left a big gap in the frame when the camera was focused on Hrundi. I think the placement works well for all camera angles. I also arranged the shot on Bill so the lamp sat in the corner of the frame, again to try and balance out the shot.
I also discovered how to tile textures in the hypergraph for the carpet, and created Lambert and Blinn colours for the matte areas of the scene, the gloss effect on the pool balls and the reflective metal edges of the table. I modelled the pool cue from two separate cylinders, deleted faces, merged vertices and textured each part.
I have learnt an enormous amount from creating this scene, and I am confident that I can now take this knowledge forward into future projects.
Well, I've certainly learnt a lot about Maya, that's for sure. For a week, the software was repeatedly crashing on me for an apparently unknown reason and I was unable to work. But thankfully after a couple of visits to see Alex Hulse at Ravensbourne, we managed to get to the bottom of the problem.
I then encountered another problem. Rendering. I've had this ongoing issue of being unable to render with my machine, and I had absolutely no idea why. I've only had the laptop a couple of months, so I was positive it couldn't be a hardware issue. I'd formatted it twice, reinstalled OSX and then tried versions 2011, 2012 & 2013 of Maya. No joy.
I had carried out numerous searches online to try and diagnose the problem, but then, eventually, I did find a solution. It seems it's a quirky thing that happens in Maya. I won't bore you with the details but there is a way round it. Thank goodness.
Well, whilst problems do occur you do learn from finding solutions to them, and I have definitely experienced that on more than one occasion this term. I can also now appreciate how long to leave myself to render, as although I began testing two days ago, i'm still working and tweaking things right up to the deadline. Generally, I feel I have covered an enormous amount of ground on the course considering I only started halfway through the second term.
After my initial troubles getting going with this module, I have thoroughly enjoyed working on it, and i'm happy with my final piece. I have put a lot of time and care into it, and I hope that comes across in the final animation.
Yesterday, I rendered my first full movie at production quality at 640 x 480.
Here it is:
I think it looks pretty good. I made a few notes on how it could be improved:
I'm now on my final render, I started last night at 10pm. I was up until 3:30am, then got up at 7 to continue. There's now 3 hours left to the deadline.
I have 4 cameras in my scene to render from sequentially, but I haven't been able to find a way to batch render them one after the other, automatically. So, I am making renderCam1 renderable and rendering frames 1-120. Then renderCam2 and render 121-154 etc.
I am doing my first test render in 640x480 with a Final Gathering preview on, to cut down on the render time. I'm intending to use final gather as it has looked very nice in some of my single-frame test renders. Final Gathering gives a more realistic lighting effect as it allows to bounce light off different objects rather than simply project onto them.
For my scene, I wanted an establishing shot with some basic cuts between the two characters, then ending back at the first shot.
I placed a camera side on to the table and zoomed in a few frames to give a nice gentle flow into the scene. I then spread the frames over a shorter distance to give a nice ease-in to the conversation.
I had experimented with a zoom until Hrundi says 'You are, are you not' then cut to camera 3 as he says 'Wyoming-Bill Kelso', but this felt a little too rushed on the zoom to the table, as I had fewer frames to play with.
Here is the original (which I decided to use):
And the quicker zoom (which I scrapped):
I then cut between Hrundi and Bill as they spoke in turn. I created a close-up and slightly lower angle for Bill in camera 4, to emphasise his dominance in the situation and his physical strength. I hope I managed to convey this in the final animation.
During the tutorial, the render setting require you to use an indirect lighting option in mental ray called 'Final Gathering'. This I found, increased the rendering time dramatically, but also the appearance of the scene as illustrated below:
With:
Without:
After testing this setting in various shots from the scene, I decided that I had to use it as it just looks so much better and introduces warmer colours to the frame.
As I had completed my animation, I turned my concentration to improving the appearance of the scene.
I found a couple of useful tutorials online which covered basic 3-point lighting and started to implant the techniques into my setup. I started with a basic spotlight directly at the two characters from outside the scene and adjusted the attributes to suit.
I then added a directional light (coming down from the lamp) which acts as a backlight for the two characters. I also added two area lights at each end of the room, to light those areas. I reduced the intensity on these lights as I learnt that you should have one, dominant main light, then the fill lights should compliment it.
This was my initial 3-point light set up:
I got some very nice effects with raytracing and final gathering. I also put an off-whitish tint on the area lights to give a warmer feel to the scene:
As I began to improve the appearance of my scene, I also began wondering if there was any way of getting Morpheus out of that grey leotard and into some nice clothes.
I did an online search and found a website dedicated to clothing created for the Morpheus rig. They are all freeware and downloadable for not-for-profit use.
In the pack, there are a few different costumes, one of which I thought would be good for Hrundi:
And another which I thought might be ok for Bill:
I was able to attach the clothing to the rig in the default pose, but as i'd already moved on from there a long time ago, I was unable to bring them into my scene at this stage, which was a shame. It seems you need to attach the clothing to the characters first before you begin to animate. Never mind.
There were also some other interesting costumes in the pack, such as the one below:
I wanted to add some props to my scene, and I first began to look for a pool table like the one in The Party. I found one on a website called turbosquid which cost me $1.
I couldn't import the textures correctly, so I ended up texturing it myself with a plain Lambert for the base, pockets and wooden panels on the top, and Blinns for the metal highlights, as they give a nice reflective, metallic sheen.
I then found the lamp, which was free on a site called creative crash, and also the 'duff' beer can. I couldn't find a pool cue, so I made one myself. I created a cylinder, then scaled it into a thin, cue-like shape and duplicated it. I then scaled that down to create the handle. I deleted the faces on each end and merged the vertices together to create the complete cue. I then used a locator to attach the cue to Bill's hand and have it move with his hand.
After the Keith Lango VTS tutorial, i felt confident to go into my scene and start implementing some of his techniques. I began with the brows, this worked particularly well with Hrundi. At the beginning when he recognises Bill, I combined a wide-eyed, starstruck look with a slightly raised eyebrow, to pretty good effect (below).
This also worked very well with Bill, particularly in the section when he gets emotional after Hrundi tells him he's seen all his films. I managed to incorporate some useful shadowing here of the brows with the eyelids (below).
I've completed the head movements from Hrundi and Bill, including all the blinks and eyebrow tweaks etc. I'm quite happy with them and I think i've captured the desired range of emotion from both characters.
I watched another interesting VTS tutorial from Keith Lango on eyes.
He first explained how the eyes move in relation to other parts of the face, e.g. the lower lids tend to react to cheek movement. And when we blink, it's mostly the upper-lid which moves with a little of the lower, with the lids generally meeting below halfway.
Keith also explained that if possible, you should try and represent the angle of the eyebrow with the top eye lid. This is known as shadowing, and I will be looking to incorporate into my character's expressions. This helps to 'sell' the idea of emotion to the viewer.
He also came up with a thought-provoking analogy. He said to think of the face as a saxophone. It has lots of different buttons, but can only play one note at a time. Meaning, every part of the face should be complimenting that one emotion, NOT playing a different tune to each other.
He then went on to explain the Blink and how to use it:
The Basic Blink
- 2 frames to open
- 2 frames to hold.
- 4 frames to close.
(2 - 2 - 4 @ 24fps)
Generally with a blink, there is a fast-in and an ease-out. So by frame 6, you can move the lid further, so it is most of the way open.
If shadowing (the movement), take the 2nd frame (brows down), 9th frame (brows up).
A Half-Blink
Sometimes useful when a character is in thought, applying effort, is distracted or confused.
There is NO Hold.
- 2 frames down (close halfway).
- 3 frames to open.
As a beginner's guide to eyes and using blinks this was very useful. I will definitely be looking to incorporate these into my scene.
I watched the Keith Lango VTS tutorial on Poses and it gave me a good insight into how I should be setting up my characters. Tips such as adding Appeal & Emotion to your poses were useful, as you wouldn't normally think about posing in such a way.
As Keith explains it, you use Appeal to draw your audience toward the character, so they can read the character and understand them easily. The audience have to care about the character, to relate to them so they hold their interest.
These are some useful tips I took away from Keith Lango's video on posing:
There is a 'line of action' with posing, you should try and create a 'force'.
There are lines flowing in a strong direction, there is a sense of motion, even though it is a still image.
Look at where the characters force is driving.
Don't have all poses the same size & intensity, think of a mountain range where some peaks are higher than others.
All parts of the character create a visual flow.
Plan and understand what is important to look at in the scene.
Use animation principles as a guide, NOT a checklist.
Good flow makes animation easy to understand.
If using props, work them into the flow.
Tilt the head! It adds weight, personality and accentuates the line of action. Helps make your characters accessible and appealing.
Add energy to the pose, don't have a straight up and down line of action.
Shift weight off both feet and distribute unevenly.
This was to prove the most challenging part of the animation.
Largely due to the sense of Bill pulling Hrundi's arm up and down rather than a 'regular' handshake where both parties have the same grip. The handshake emphasises the strength of Bill and the weakness of Hrundi, so it was important that I got it right.
I found that I was unable to use a locator to attach both hands during the shake, so I had to manually make them grip through each frame. I added some follow-through on the hand movement at the top and bottom of the up and down movement to try and emphasise the power of bill's grip.
Although this was difficult, I thought it worked out reasonably well. If I ever have to animate a handshake in future, this will definitely give me a building block to work from.
I did lots of playblasts for this sequence, this being my final one:
I haven't tested out Bill's lip-sync so much at this stage, as Hrundi is the main character and the focus of the scene and I want most of the attention on him. I intend to come back to Bill's lip-sync to polish it up later, but I have run the following tests on him thus far.
EDIT: I went back and cleaned up Bill's lip sync a lot toward the end of the project. I also closed his mouth between him speaking as his lips were drifting around between keyframes.
These are my initial lip-sync tests for Hrundi. I acted out all the speech in Photo Booth, taking care not to over-pronounciate and use visemes. I then played back the clips and attempted to recreate the mouth movements to get the right shapes for the sounds.
I am happier with my lip sync for Hrundi than Bill's, probably as I have spent more time on it. Hrundi will be the main character, and the focus of the scene however, so this is how I intended it. If I have time toward the end of the project, I will return to Bill's lip sync to polish it up a bit more.
This is the scene I am now concentrating on. I've had a frustrating time over the last week as Maya has repeatedly been crashing on me. I've had to go back to an old save from this scene to continue with my work. The clip starts at 1:39....
I acted it out to try and get more of a feel for the scene. First as Hrundi....
Initially I decided to work on a scene from Withnail & I, in which they upset a local drinker and almost get into a fight. I felt this had good action, tension, comedy and a range of emotions which would be good to try and animate.
Here is a playblast of my first attempt in lip syncing Withnail:
This is a first test using the Morpheus facial setup to attempt lip syncing using the clip given to us by Mike to experiment with.
I felt that it went ok for a first test, however the feedback in my formative was that the lips were too flappy and I agree with this. The movements need to be snappier and actually not so pronounced either.
The important thing is that I have learnt from this exercise, and can now improve on it when I come to animate the lip sync within my scene.
The four basic shapes the mouth makes are open/closed and wide/narrow.
That's it really. When lip-syncing a character with a
plain circle for a mouth, the shapes in Figure 1.2 are all
that’s needed to create the illusion of speech. This is the bare-bones of the method without all the detailed lip-curling for specific letter sounds such as 'F'.
"Animating lip sync is all illusion. What would really be happening isn’t nearly as relevant as the impression of what is happening. How about M? You may be thinking, “I need
to roll my lips in together to say M, and I can’t do that with a wide-narrow-mouth-thing-
amajig.” Sure you can, or at least you can give the impression in motion that the lips are
rolled in—just close the mouth all the way—and that’s usually going to be good enough."
Jason Osipa, Author of 'Stop Staring'
This is the issue I was having with my first tests of lip-syncing. I was recording myself in Photo Booth overpronunciating each word, then trying to animate in Maya. This made it look over the top and unrealistic. Here is an example below.
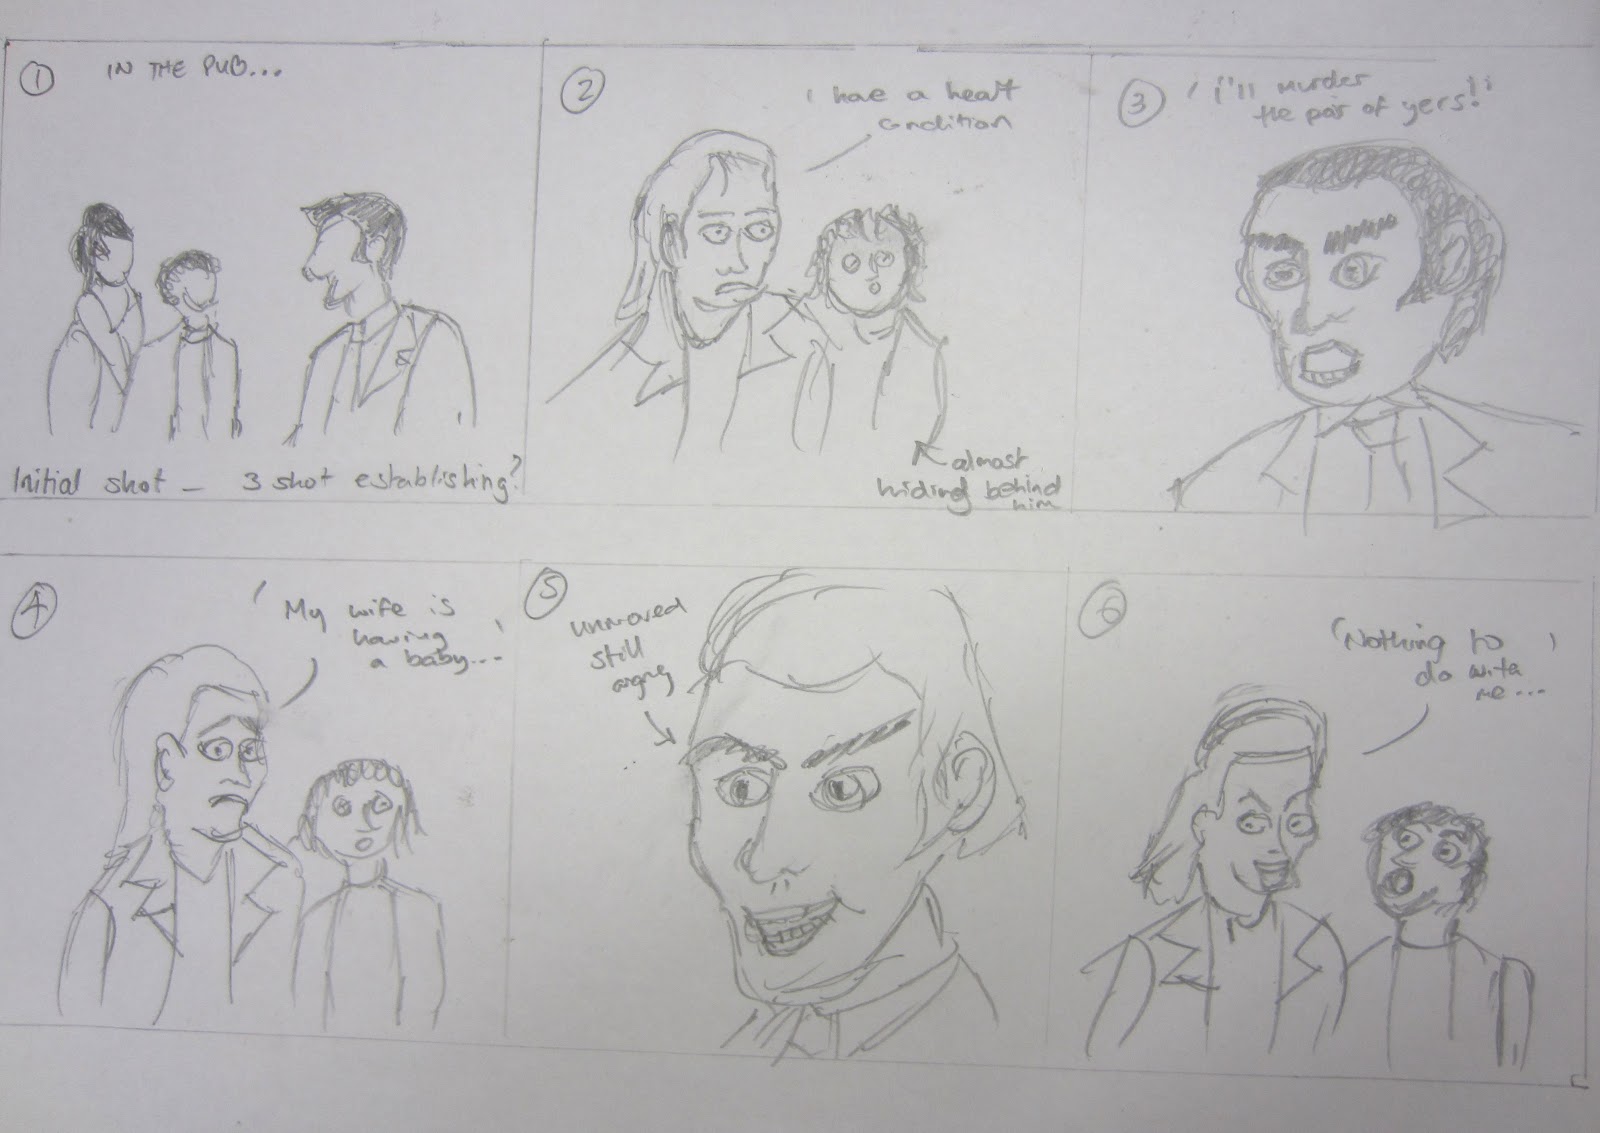
This is a basic storyboard for my scene. I went through and highlighted the different camera shots, from an initial 3-person introductory shot to the close-ups as the conversation goes back and forth and becomes more heated and tense.
There isn't much physical acting in my clip, it is more about the emotions and expressions on the characters faces, so my shots will focus on mid-close up shots of the characters.
Began finding my way around the Morpheus rig, and created some characters using one of Josh Burton's tutorials. It was a good intro to the rig as he has you creating characters of different sexes, sizes and shapes. I then attempted to create some different strong poses using each character which gave me a feel for where all the handles are on the model.
I began to look for a variety of film clips to use in the main project for term 3, which is Character Animation and Visual Studies. In this term we will learn lip-syncing and introduce this element into character performance.
In our first session with Mike, he advised us to show the character thinking and to make it believable. To choose a piece of dialogue with a range of emotion, but advised us not to choose Jim Carrey but to choose something subtler. The key element Mike described was to make your animation piece different, to make it stand out from the crowd. I can fully imagine these studios get hundreds of showreels every day with over-the-top Jim Carrey-style animations, so I can fully understand the logic behind this.
With this in mind, I began to try and source a clip for my 20-second(ish) animation.
Withnail & I - 'Heart condition'
I think this clip would be perfect to use. It is about the right length, Withnail displays a variety of emotion from sadness, fear, humour etc in a short clip. Some fantastic facial expressions from Richard E. Grant would be very interesting to try and interpret and animate. The extract i'm thinking of using starts at 0:50 secs.
Bruce Lee - 'Finger pointing to the moon'
I think this would be a good clip to use as there is some visual humour involved with the slaps from Bruce Lee, some thinking on the part of the student which would be interesting to animate. The extract starts at 1:04 secs.
Bruce Campbell - 'Little Goody Two Shoes'
I really like this clip, it's got some wicked humour from 'bad' Ash, a puzzled look on 'good' Ash's face and some comedic violence which would be good to try and animate. The only thing I would worry about would be is if this is too far removed from the brief, which is more about facial expressions and lip-synching, rather than character action. I will get some feedback about these clips this week, so that will help me reach my decision on which clip to use. The extract I am considering using starts at 1:20 secs.
Donald Pleasance - 'Hey Lonnie, Get your ass away from there'
A clip from 'Halloween' where Dr Loomis scares some kids from behind a bush. It's the right length, and there's some comedy involved as Loomis looks pleased with himself after they've run away. Would be good to animate, but perhaps not enough emotion and facial expression.
Peter Sellers meets 'Wyoming' Bill Kelso
Scene from The Party where Hrundi meets Bill Kelso and has the privilege of having his hand crushed. Good length, acting, emotions and comedy. The section I'm looking to use begins at 1:35
Here is another clip from later in the film i could use: